Homebrew Pinball #3, Part 50

Cross posted from the original Pinside thread, this is one of many posts regarding my third homebrew pinball machine, creatively nicknamed 'P3'


Added a post on the upper right of the lanes, and luckily it doesn't seem to affect orbit shots, so I think that converting my two rows into one 4 lane row is doable. Plus, since I still have the switch down below, I don't need to make any further playfield changes for now to work with it. The action is also not too bad. The ball doesn't stay up there long, so you have to lane change fast, but it's not impossible. I feel like the lane change on some games makes it almost too easy.

I do wish the gates were a bit more bouncy though. You only get maybe one bounce off each of them even on a strong shot; I'd like it if the ball bounced back and forth a few times. Not sure if that's something you can do much about though. Maybe I'll play some some foam or springs eventually.

As you can see in the image though, there's one small issue: the right gate is a bit too far to the right, so the ball gets hung up from time to time. I'll need to move it a bit to the left eventually, but for now it doesn't get stuck too often.

Posted Tuesday, November 16, 2021
at 10:13 AM


Tags: Blog Post, Pinball, Project, P3,

Homebrew Pinball #3, Part 49

Cross posted from the original Pinside thread, this is one of many posts regarding my third homebrew pinball machine, creatively nicknamed 'P3'


Did some testing with the plastic covering... I previously tried to do a full playfield protector on one of my games, but as expected, it warped and raised off the playfield, presumably due to heat expanding/shrinking. However there are many european pins that have plastic playfields and don't have that issue. I'm not sure if that's due to the material (IPDB claims they're plexiglass but I don't know how they tell) or the thickness (I've now gotten confirmation that at least one manufacturer, Interflip, uses 1/4" plastic over their 1/2" plywood).

I cut two strips of plastic, one from the new sheet of lexan I bought for this project and one from the scraps that (I think) are from the previous full protector I made (hard to tell these sheets apart :/ ), and attached them to a piece of plywood, then I stuck it in my Dracula (the only game I have handy that's all incandescent) to 'bake'. After 12 hours, I could see some slight raising on the old material, and minimal/none on the lexan, which is promising at least... I'm not sure exactly what conditions are needed to reproduce the issue though. Is it just heat expanding the plastic? is it air under the plastic heating due to inserts? Presumably it's more noticeable on larger areas with no anchoring, but that's harder to test.


I also did some more practice cutting of my spare sheet of lexan. Trying regular drill bits and forstner bits. The forstner bits seem to leave more of an edge on the holes. Both seem to have some risk of creating weird spirals of plastic (like on the rightmost hole in the picture). Cutting on wood seems to help, I think since the bit can't 'punch through'. I was able to get pretty clean holes with a drill bit at medium speed. Too fast or too slow tended to cause issues. I also need to make sure to hold down the plastic around the bit as much as possible, to keep it from pulling the plastic up.

Experimented with cutting straight lines as well, and found that it's possible to do pretty cleanly with an exacto and ~5-10 passes. Definitely preferable to power tools. Can also be cut with scissors but they're hard to get into the holes since you're not cutting from the edge.

On last annoying thing: apparently the plastic sheet I purchased is 1/32". It's been a while, but I thought I'd requested 1/16 as 3/32 wasn't available, and I felt like that was the most that could be potentially layered on top of a 1/2" playfield without affecting the mechs+etc sticking through. I'll still use the sheet though since I've already got it, and hopefully it works okay. If I run into issues with it flexing or expanding, but everything else is fine, then i'll consider buying another thicker sheet

Posted Tuesday, November 16, 2021
at 10:12 AM


Tags: Blog Post, Pinball, Project, P3,

Homebrew Pinball #3, Part 48

Cross posted from the original Pinside thread, this is one of many posts regarding my third homebrew pinball machine, creatively nicknamed 'P3'


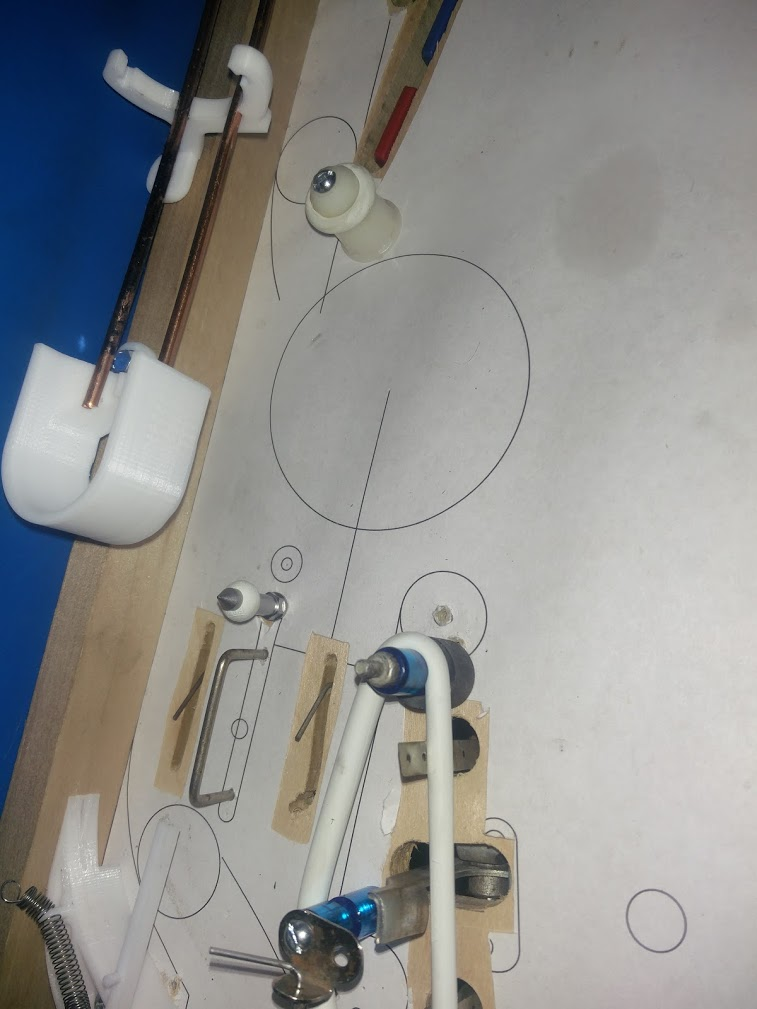
With the gate figured out, I'm almost ready to tear the playfield down and start cutting my lexan covering. There's ones area I'm still not satisfied with though: the upper right area

my original design for this was intended for it to be two offset rows of three lanes, using the shot behind the upper drops as the third upper lane. Like on EMs, you'd shoot up there, bounce around, and try to nudge into the lane you want, then fall down into the pops. But it isn't working out the way I wanted.

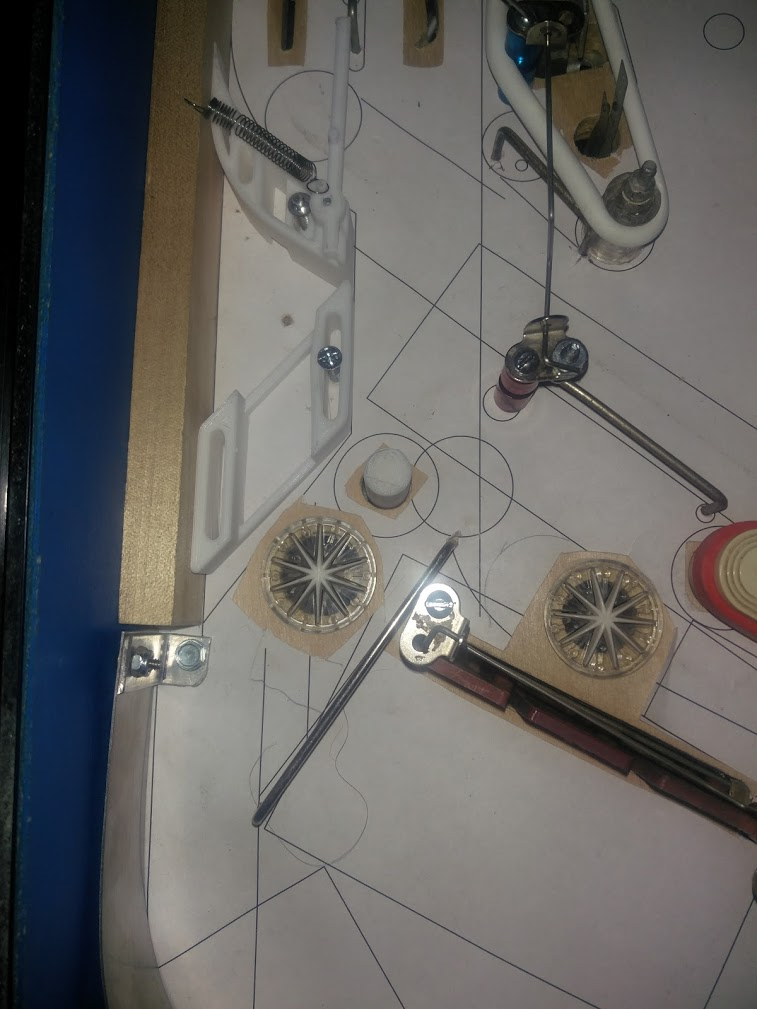
1. due to the path of the ball coming through the spinner, I had to remove the mini post I was going to have on the far right of the lower lane, so now balls tend to just roll off to the right instead of going over the rollover
2. there's only one pop bumper, and it's not directly below the lanes. you don't get balls going back up through the lanes much. instead, the ball rolls down to the pop, and gets shot back up to the area below the lanes, and then just falls back down to the pop again. Sometimes this can repeat 5x before the ball works its way around the pop and back into play. Not satisfying.
3. Due to the small size of the divider posts, it's much harder to nudge the ball where you want it than it would be on an older game, which would use 1/2" posts.
4. again, due to the way the ball comes in from the spinner, there's a gap between the rightmost post and the one way gate. When you shoot through the spinner, about 40% of the time, the ball bounces off the left gate and falls perfectly back through this gap, never entering any lane.
5. the lanes are so close to the top of the playfield that there isn't much room for the ball to move around. This also means that the exit of the lane behind the drops doesn't flow well since it just bangs into the top arch. I originally wanted it to shoot around the orbit.
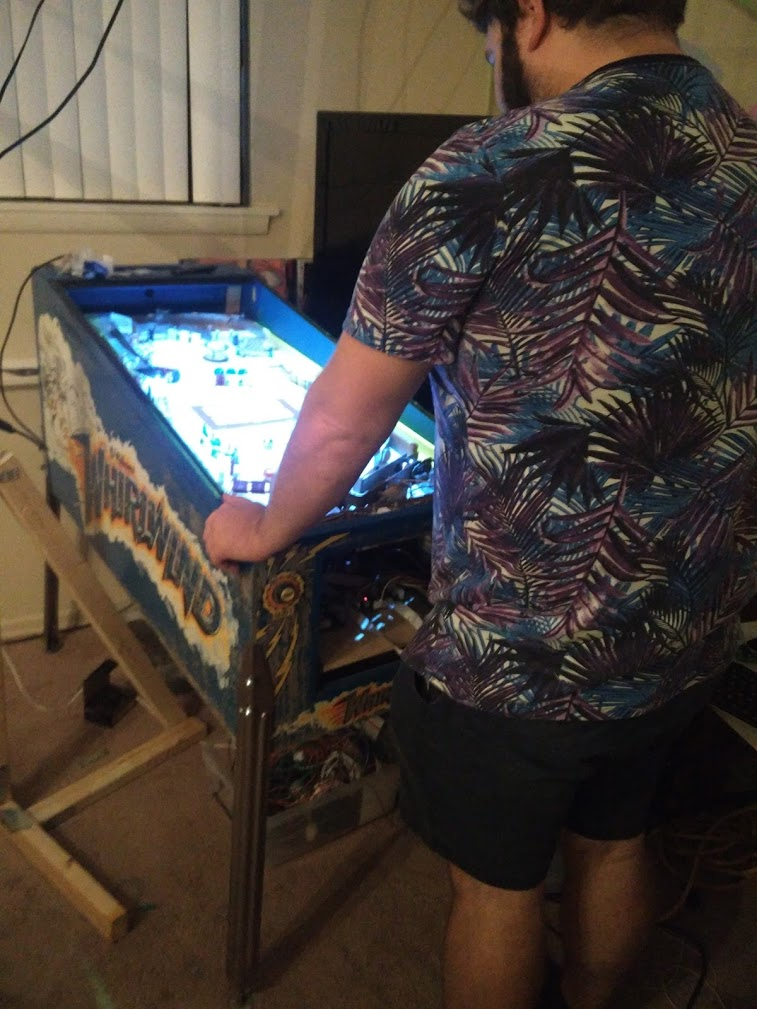
6. because this playfield is longer than an EM, being in a whirlwind cab, the lanes are even farther away from the player, which makes it harder to figure out where the ball is going or nudge appropriately

Part of the small spacing is caused by the lane behind the drops, but I don't want to lose that shot since I want to use it for jackpots during multiball. At a minimum, I need to adjust the playfield somehow so that the ball can't escape the lanes on the right, but I'm considering reevaluating this area further...

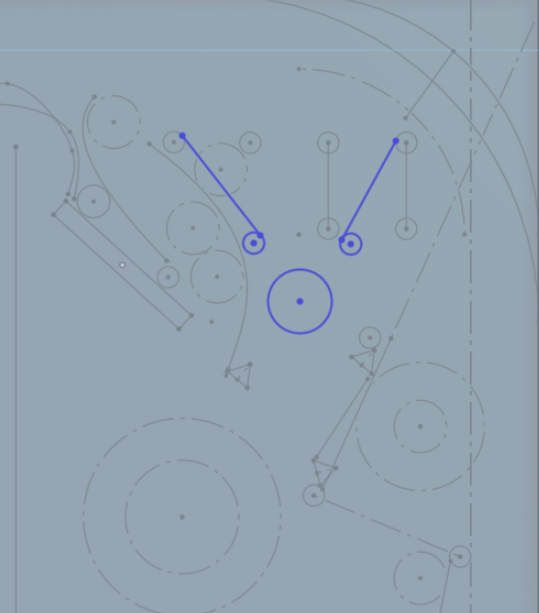
A simplification of the lanes?

Basically changing my two sets of three lanes into one set of four. This would solve the gap on the right issue. It should function ok, as long as the rightmost post/divider doesn't interfere with the spinner shot. There'd be no room or time for nudging, so this would have to be just a lane change affair. I'm not sure how much the ball would bounce around up there though, with the upper rail so close to the posts. Would you even have time to read the ball movement and try to change lanes before the ball had fallen into one?
The pop bumper will still feel a bit weird with the ball popping into that dead area repeatedly though. I'd like to move the pop bumper down some, but moving the entire bumper isn't something you can really do once you've cut its hole, so that'd have to wait for another whitewood...

Maybe get rid of the pop bumper completely?
Although I like having a pop bumper (especially one pop bumper, which recalls games like Stars, Meteor, or TNA), I'm not sure it fits this design that well. it tends to make play on the upper playfield very chaotic. If you don't hit the drop you're going for on your first try, you're out of luck because the pop bumper will pop the ball around and take out 2-3 drops before you can get control again, which is half your hand. I'd hoped it be more of a 'danger' off in the corner, but during play the ball tends to hit it any time it's up there.

One thing I originally envisioned for this layout was that the center drops would be angled the other way, allowing you to bump the ball back towards the upper left flipper off them, but the spacing for that didn't work out. Adding a small rubber here might make the play up there more interesting, allowing you to bounce the ball back to the upper flipper. I could put a target on the back of that rubber too, to give the upper right flipper another target to shoot for. It was supposed to be able to hit the target on the upper left, under the ramp, but it turns out the flipper can't hit something that high up, so that target is basically useless.

Instead of lanes, I could try to do something like many williams EMs have?

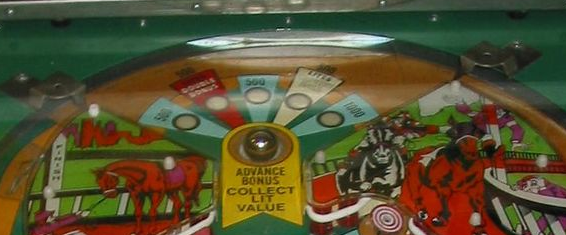
A kickout hole with rubbers on either side to alternate the award. It's a fun area to play in, trying to nudge the ball back and forth to get it to land on the award you want. I'm not sure there's enough room for it, or what the awards could be though.

Or maybe something completely different. Get rid of the upper section completely. No more one way gates; the ball always does a complete orbit. Lots of other ways you could take this, but here's one idea I came up with:
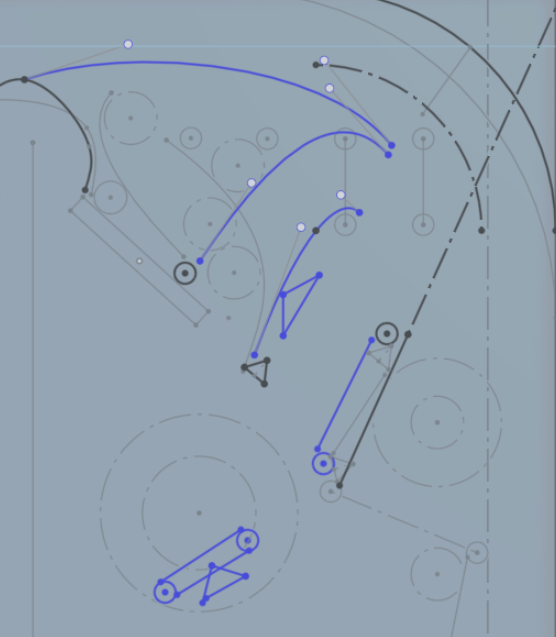
The shot next to the drops is still there, it's just redirected to feed the right orbit cleaner. Hopefully with this the ball could feed down the right to the inlane, or get caught be the magnet to feed the upper right flipper. The area below it could be an extra hard skillshot: plunge just to the beginning of the arch to arc the ball into that lane.

Or maybe that lane is also shootable via upper left flipper? The pop bumper would need to be removed to unblock the shot, but...

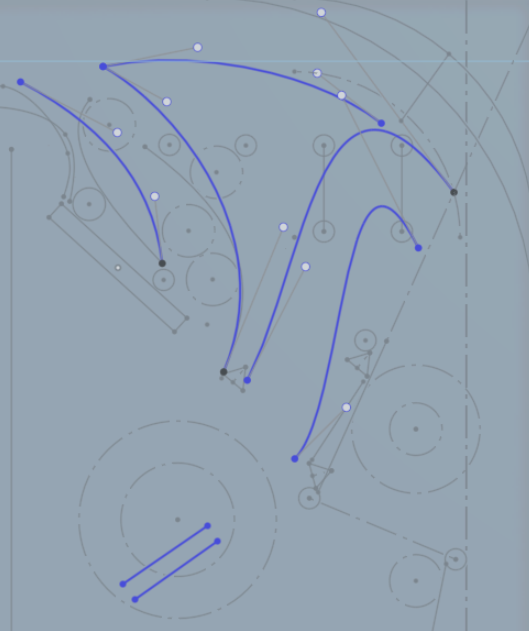
Now you have two shots from the upper flipper. One feeds the left inlane to the lower left flipper, one feeds the right lane to the upper or lower right flipper, or shooter lane. I've always thought that was a cool idea, although it makes more sense on a more combo/flow game. Demolition man technically pulls it off, but the side ramp is so hard to shoot compared to the subway that everyone just goes for the subway. With equally easy/hard shots the flipper could act as a 'skill diverter' letting you intelligently set up more combos. Maybe that could still make sense for this game though, as long as the rules set up something for each lower flipper

These last two redesigns look a bit weird on first sketch, but there's a lot of room up there to tweak things and make them shoot smoothly. Having a large empty area like that feels weird to me though... As a designer I like to use up every single square inch of playfield, so having a large empty plastic like that seems like a waste, but maybe it's for the best?

Tomorrow I'm going to pull out the pop bumper and patch in some wood in the hole, and see how the upper area plays like that. Does it shoot better? Can an extra rubber there make the ball bounce back the way I'm thinking? Can the upper left flipper hit that rightmost shot? Can the upper right flipper hit that rubber?

I'll also try placing some more posts in the upper right area, see how far to the upper right I can put stuff without interfering with the spinner shot. I imagine if you get too close to the upper arch the ball is going to hit the post, since it's probably rattling around a bit as it meets the rail...

Thoughts? Any other cool ideas?

Posted Tuesday, November 16, 2021
at 09:52 AM


Tags: Blog Post, Pinball, Project, P3,

Homebrew Pinball #3, Part 47

Cross posted from the original Pinside thread, this is one of many posts regarding my third homebrew pinball machine, creatively nicknamed 'P3'


I tried to write some code to make use of the left orbit (under the ramp), and realized I had no good way of detecting shots through there. I had originally placed a rollover under the ramp, and a hanging gate across the exit from the back the ramp. That way, shots that hit the rollover first would count as orbit shots, and if a shot just triggered the gate, I'd know that was the end of a counter-clockwise shot from the spinner as it entered the left lane. The rollover under the ramp also doubles as a way to detect balls that, coming around from the spinner, fall under the ramp instead of going down the left lane, so I can raise the ramp temporarily to let the ball out. Which is good since that happens *a lot*. That should have all been good, but it seems it's possible to shoot under the ramp and not trigger the rollover, probably due to the width of the ramp and the ball bouncing around. So often I was just getting the gate switch, and had no way to tell which direction the ball was going, which was a problem. I also wanted to improve this area to give a cleaner feed to the left lane from the spinner, and prevent balls going under the ramp from the back so often.

Enter: the longest gate ever

Now it senses balls coming through the left orbit, using the same hanging wire as the previous gate did, and prevents balls from going under the ramp from the back, instead feeding them to the left lane. These little gottlieb L brackets for mounting gates+spinners are a life saver, they allow me to do all kinds of weird things with gates. Just need to make sure they're aligned properly

Posted Tuesday, November 16, 2021
at 09:51 AM


Tags: Blog Post, Pinball, Project, P3,

Homebrew Pinball #3, Part 46

Cross posted from the original Pinside thread, this is one of many posts regarding my third homebrew pinball machine, creatively nicknamed 'P3'


I realized that the top lanes still did nothing outside of the skillshot, so I decided to add a quick rule that one lane would give you more magna-pulses, but this reminded me that I still didn't have any ability to sense the flippers being pressed. I've been making do so far with using the secondary buttons for stuff like navigating menus, but you can't really use those during gameplay, and I want to add a status report soon since I'm getting to the point where the screen is getting filled up with information.

Since I'm using directly controlled flippers with high voltage contacts, this isn't as simple as it would be with software controlled flippers. I don't want to use switches on the flipper mechs like early games did since that seems to have some lag sometimes, and I can't add switches to the buttons since they're already double stacked for staging, so I'll need to do it electronically. Looking at other games, system 11, WPC, and gottlieb system 3 use opto-isolators to sense the HV signal going to the flipper, but I didn't have any on hand and have never used those before, so I tried to come up with a simpler solution.

My thought was, since my flippers are grounded by the cab switches, I should be able to just hook some 3V circuitry in parallel, since ground is the same for both. I put a diode between the chip and the cab switch to prevent the high voltage from going backward, and used a 74367 tristate buffer chip, so I could hook the switch matrix column to the enable to simulate a physical switch. A quick test with a breadboard hooked up to the switch seemed to work, so I assembled this one off board
Optimally this would have been part of my MPU board, but I wasn't sure what the circuit would look like at the time, so I left it off. Once it's battle tested I'll probably design a new MPU with the added stuff but for now this'll have to do.


Wired it up and ran into an issue... hitting either flipper button registered both sides. of course, not something I ran into when testing just one side with the breadboard. The signal seems to be traveling backwards into the playfield, through one coil to the HV line, then back through the other coil. I ended up just putting some beefy diodes in line between the flipper coils and the contacts to prevent that.

Also had an issue where the right flipper button (row 1, column 8 ) was also registering as the switch in row 1, column 1. Left button (row 7) was fine. Eventually concluded this was just due to the order I scan the matrix (row 1->8 for each column 1->8 ). I must be scanning it faster than the circuit through the chip can react, so it's still reading as closed for the next column (1 is after 8 ), but corrects itself before it gets to the other rows. Added a tiny delay after finishing the last column to account for that.

Posted Tuesday, November 16, 2021
at 09:51 AM


Tags: Blog Post, Pinball, Project, P3,

Homebrew Pinball #3, Part 45

Cross posted from the original Pinside thread, this is one of many posts regarding my third homebrew pinball machine, creatively nicknamed 'P3'


Another lingering problem I've been having is with the slingshots and pop bumper. Originally I was going to control them through the driver boards like everything else, but I realized I'd be able to use 2 boards instead of 3 if I powered them separately. So I figured I'd just drive them with Gottlieb pop bumper driver boards. I had some spares, and they're purpose built for this purpose. But for some reason I can't seem to get them to work well. Unless I gap the switches incredibly wide, the boards will rapid fire. So after a lot of fighting with that I decided that I could make a better pop bumper driver board!

Instead of relying on a 555 timer and some capacitors to handle timing and debounce, I'd use a cheap CPU (a PIC16F1827 8 bit CPU) and code it to work exactly how I needed. Plus, then I could use a single board to drive all three of my coils (these gottlieb boards are so spread out and wasteful!). Since I already had the wiring harness set up to use them, I designed the board so it could work with multiple original 6 pin connectors, or with just two custom connectors (one for inputs, one for coils). And since the CPU had 15 IO pins, I made it drive up to 7 coils (why not?). Still the same size as the original, and mounts using the same standoffs:

I built one up, populated the components for three coils, and hooked it into the machine. It took some tweaking, but the results are quite good. I'm now able to gap the switches incredibly close, so the kickers are super sensitive, and I can adjust the pulse time to get the strength where I want it. The pop bumper is now much stronger, and the slings got set a bit weaker since they've always been concerningly strong when they did get triggered

Curious to see how it performs compared to an actual gottlieb, so at some point I'll build another of these and stick it in my Alien Star, assuming I can get all the connectors to reach

Posted Tuesday, October 27, 2020
at 03:01 PM


Tags: Blog Post, Pinball, Project, P3,

Homebrew Pinball #3, Part 44

Cross posted from the original Pinside thread, this is one of many posts regarding my third homebrew pinball machine, creatively nicknamed 'P3'


Had ideas floating in my mind as I went to bed last night, so I spent labor day turning my 3d printed down-post:

Into this:

(experiment! can you see this in 3d here? https://cad.onshape.com/documents/e14cc6f13a9ec312b7e371b0/w/a5bf5ad363bb92618999d587/e/dd1e5e8e912c1fee6b05a354)

It mounts in a standard slingshot bracket; when the coil energizes and pulls the plunger (which attaches to the bottom of this part) down, it also spins around about 120 degrees in its channel.

The thing fits in about the same area as just the coil (and could be made smaller too, but I sized it around the hex base which is 9/16 for easy mounting with a wrench), so there's no clearance issues compared to the plain post that was there before.

I had to rearrange things slightly since the existing post+hole wasn't in the proper position for a gate (which would optimally be right above the wire guide, but in the end it works since it also gives me more room to bounce the ball around a bit, giving the player more reaction time, which was another goal I had when reworking this area.

Will have to give it some more playtesting to make sure it holds up well... In the long term I'd redesign this area a bit further around this new mechanism. The two rollovers aren't needed anymore, since it's basically impossible for the ball to go the wrong way which also means two switches saved (I think my matrix is nearly full), two less cuts needed to be made in the playfield (and the eventual plastic cover). The post can be moved a tiny bit closer to the drops below. I can use a shorter metal rail since I don't need to have it extend up to work with the up-post, or maybe a small custom-cut guide can be made to fit below the post and provide a smoother transition to the outlane. Instead of the temporary red post I added on the left, I can shape the inlane guide above it to fill in that area.

It took about 12 prints over 10 hours to get everything right since I didn't really plan this out before hand, and didn't know what measurements I was working with, but in the end it's working smoother than I expected, so not bad for a day's work

Posted Tuesday, October 27, 2020
at 03:00 PM


Tags: Blog Post, Pinball, Project, P3,

Homebrew Pinball #3, Part 43

Cross posted from the original Pinside thread, this is one of many posts regarding my third homebrew pinball machine, creatively nicknamed 'P3'


Lots of playtesting happening while I try to figure out what direction to take the code in. I've gotten a few others besides myself to playtest, such as my old college roommate who dropped by for dinner one day:

He's not a pinball player, and has probably played 20 games of pinball in his whole life, so it was interesting comparing how he played it with how other, regular pinball players did. Another interesting difference though, is that he knows how to play poker, vs another playtester who plays pinball a lot, but doesn't know poker too well. One person trying to actually play poker hands, go for good hands, etc even though their accuracy and control were minimal while another mostly ignored the hands. I need to make sure that the game is fun for both types of players.

Watching people play has also given me more chance to actually watch how the game physically plays and I've noticed some areas I don't like:
The right inlane/outlane area was giving way too many inlanes vs outlanes. The metal wall on the side of the slingshot to smooth the orbit feed doesn't help either, as it's effectively making the inlane even wider. I thought from my initial design that it'd be very outlane heavy but either the wood outlane wall is bouncier than I expected, or the angle the ball tends to come in just is leading to that sort of path... I added a mini post with a small rubber right above the inlane guide, which seems to help a bit:

My ability to place the post is a bit limited since I need to make sure not to interfere with the orbit feed from the diverter, so I couldn't really place it much higher, or any more to the left (which I wanted to do to make the outlane 'wider')

The left outlane had similar issues. The ball was going down the inlane much too often, and again I couldn't really change the size of the inlane that much since it's also the left orbit return feed. So I needed to play with the outlane instead. I started by swapping the left slingshot post from a star post to a thinner post, but that didn't have much effect. So I started moving the post down+right, keeping the front 'face' of the slingshot the same since I still need to keep it aligned with the switches. It's now down as far as it can go without touching the upper switch, which also required dropping from a 2.5" rubber to a 2" rubber. Still, the ball tended not to go down the outlane that much. I also added an old data east half post rubber to it, since I've found these tend to have a deadening affect on the posts, but it didn't really have a noticeable affect.

I also noticed that the magna save wasn't getting used. At all. Whenever the ball came over to this area, it'd either be down the outlane or inlane instantly; there was no time for nudging or reacting, let alone using the magnet. Eventually I'll probably move the magnet lower, since the slingshot has gotten so much shorter, though I don't think that will help the speed issue that much. I'm not sure if the issue is just that the game is too fast, or if the geometry is also having an effect. I added a mini post in this outlane too, again being careful to not affect the orbit feed while moving it as far to the left as possible, and also added a post above the magnet. I'm hoping that this will cause the ball to bounce off the posts more, leaving it in range for the magnet to be used. This whole area is a bit cramped... I wish I had had a widebody cabinet to use instead of a standard width, mainly for this left side. The feed down the left wall could really use another inch or so to play with, but oh well.

Playing with posts like this is a bit nerve-wracking. I can picture there being a lot of minor adjustments I'd like to do, but once you put a post in one place, you can't put another too close or the holes will interfere with each other. Right now I'm 'testing' by holding the post upside down so the rubber is at the proper height while trying to roll the ball through in all kinds of directions to see how it plays, which is working okay, but you can't really do any advanced testing. Most commercial games have slots for the posts to be moved through, but that is still only one axis, and those slots are difficulty to cut by hand. I'm almost tempted to make a custom little assembly with large washers above and below the playfield, so you can then just drill like a 3/8" hole in the playfield and position your post anywhere in there...


The lower/mini playfield entrance is also giving me issues. The ball tends to rattle a lot more than I expected coming down the outlane, so sometimes the ball is going the wrong way when the post is down. Sometimes the down post and its hole cause the ball to do weird things too, since the post hole is in the path of the ball (which I've learned from owning a Jurassic Park is something to avoid at all costs...).

I'd REALLY like to have a little diverter gate here instead of a post, but the area I have to work with is extremely limited. I picked up a Stargate recently, and saw that they had a really cool diverter mech in their outlane. It's a rotating gate, but it operates via an up-down post mech, with a spiral path around the plunger, so the gate/plunger is forced to rotate as it moves up and down. I bet that mech would work perfectly, if I could somehow find one to use, but I've only ever seen it in Stargate. Maybe I can fabricate one with my 3D printer...

I'm also going to play with the post to the upper right, try to move it down and to the left as far as possible in order to guide the ball more towards the mini playfield entrance. I can't move it too far though without blocking the outlane drain path, and I need the one way gate on the inlane to still work, so this may end up being a custom shaped 3D printed post?

The star rollover on the left got positioned too far to the left, so it's possible for the ball to roll down the guide smoothly and not trigger it. I can't really move the rollover though without cutting a new playfield or something. Multiple playtesters commented that the ball feeds to the lower flipper very fast; you need a very quick reaction to flip in time once you realize the ball is going to the mini playfield instead of draining. So I may try to reshape the guide here in to try and slow the ball down and force it to go over the rollover as well.

One last area of minor concern:

Occasionally a fast right outlane drain will self-lazarus off the mini playfield exit gate. It's not too often, so I'm not that concerned, but I'd rather it didn't happen. Usually games have 'biff bars' (or whatever the official term is) to prevent this, but since I actually want balls to be savable from the mini playfield flipper, I can't have one here. Don't really have any ideas on how to prevent this

Posted Sunday, October 25, 2020
at 02:15 PM


Tags: Blog Post, Pinball, Project, P3,

Homebrew Pinball #3, Part 42

Cross posted from the original Pinside thread, this is one of many posts regarding my third homebrew pinball machine, creatively nicknamed 'P3'


More code progress, working on the first mode...

As I've actually been able to play, I'm realizing just how hard it is to get a straight/flush. The odds in real poker at random are about 3-4%. Not exactly how frequent you'd want a multiball to be... I had figured it'd be much easier here, since you're able to choose your hand, but it turns out that aiming is hard. Playing test games, I was managing to get a straight maybe 1/8 times. Not horrible, but still not too good. I also realize a general flaw with awarding modes+multiballs off your hand is that if you get 4/5 cards for a straight, that doesn't carry over. Most games if you drained while trying to get multiball, you'd at least have saved progress, but this is all or nothing. Also, getting a pair is super easy, probably too easy.

So I'm playing around with various ways to change this up. First, I'm thinking of other ways to get the various multiballs, such as using your poker winnings to 'buy' them. That way as long as you win your hand, you're still making progress towards features, and if you can pull off a good hand, you get rewarded with an instant multiball. Still some stuff to work out here though. I don't want to end up with big menus for purchasing things or anything, I'd like most of the choices to be made during gameplay.

Alternately, maybe I keep a separate progress tracker for each mode. Getting a 3 card straight would give you some progress, a 4 card would give you more, etc. Or I can combine this with the 'purchasing' mechanic, lowering the price of the multiball based on previous progress.

Another option would be to have some other multiball awarded for more standard things. I could place some shots around to spell 'LOCK' and light locks for a separate multiball, to at least balance out the game more from relying on the hard to access hand multiballs. I'm there's many ways to set this up, but I'm hesitant to add something which could pull the focus away from playing the poker hands.

I'm also playtesting the ability to undo cards. Right now I have the magna save and outlane vuk tied into the same 4-light meter, so I also added the ability to undo your last dealt card at a cost of two magna-save pulses. currently this is triggered by the start button, but eventually I figure it'd either end up as the action button (if I can manage to mod one into this williams cab), or as a cheat button below the shooter (callback to Jackbot).

Lots of options to play with, but they all require playtesting. Which is good to be doing anyway, although the game is still a bit barren right now. It's also giving me more data for stuff like the outlanes. I've moved posts around, added rubbers, etc, to try to make the outlanes fairly drainy (since there are options to save the ball), but still savable with some nudging.

What I'm finding interesting is how little chance I get to nudge things. The ball moves around so fast that it's either in the inlane or outlane often before I can react. I'm not sure if the game is just playing faster than other games (it doesn't feel that way too much), or if something is making the rebounds less predictable, etc. I'm wondering if some of this may be the paper covering the playfield. Could it play different enough from wood to cause issues? I also know that the plunge and upper lanes have some issues due to bits of wood stuck under the paper, so maybe there's more of that that I'm not aware of. Hopefully that should be handled once I get the inserts/plastic figured out. I need to spend some more time doing some practice cutting before trying to hand cut the full sheet I've got. I've also been looking into CNC/laser cutting options, but haven't had much luck so far. When starting this project I'd hoped to use the local makerspace since they have a CNC router and a laser cutter, but they've been closed due to covid Considering purchasing a cheap 2x2ft unit for myself, but I'm not too knowledgeable about the options on this front.

Posted Sunday, October 25, 2020
at 02:15 PM


Tags: Blog Post, Pinball, Project, P3,

Homebrew Pinball #3, Part 41

Cross posted from the original Pinside thread, this is one of many posts regarding my third homebrew pinball machine, creatively nicknamed 'P3'


I'm hoping to use a plastic sheet on the playfield instead of having to manually cut all the inserts and deal with clearcoating, etc, but I wasn't sure how I was going to handle the star rollovers. The sheet will end up pretty similar to a Hardtop, and I know that star rollovers cause tons of issues with those, with each hole needing to be manually cut out for alignment, rollovers raised, etc. Plus I'm hoping to cut this plastic by hand, and drilling holes in it isn't the easiest, especially for large holes. Doable, but I also have 11 rollovers on my playfield right now (and could really use a few more), so it's something i really don't want to mess with. I looked into using eddy sensors but I can't find any good cheap source for them.

I thought back to earlier EMs, especially some ballys, which have tons of small, ~1/4" rollover buttons, and I figure that those would probably have a much easier time dealing with a hardtop. But with how my playfield is designed, buttons that small will run the risk of not being triggered by the ball. Plus I don't think those small bally rollovers are available anymore.

So i'm trying my hand at 3D printing some custom rollovers:

These are designed to have a button slightly smaller than my 3/8 bit, to give a small bit of wiggle room when drilling the holes, but hopefully not enough to get the ball hung up on. They also seem to be just big enough to still have similar sensitivity/range with a normal rollover star. The transition as the ball rolls over isn't quite as smooth (partly because it's not smooth like a star and partly because my 3D printing isn't that smooth) but it doesn't seem too bad.

They'll need some tweaking, but I think they should be usable.

Posted Sunday, October 25, 2020
at 02:14 PM


Tags: Blog Post, Pinball, Project, P3,

< Newer Posts
Older Posts >

Posts per page: 5 10 25 50 100