Homebrew Pinball #3, Part 30

Cross posted from the original Pinside thread, this is one of many posts regarding my third homebrew pinball machine, creatively nicknamed 'P3'


Coded the basic structure of the skillshot. I'm pretty dissatisfied with most skillshots in games currently. Most seem to either be 'just plunge the lit lane', or plunge to a flipper and hit a lit shot. You don't really care about your plunge at all. Some games like Deadpool make it a bit more interesting by locking in your lane choice. Most games that actually require you to plunge to a specific spot (such as Taxi) just make you learn one or two plunger positions, which I think can get boring once you've learned them, since at that point you're just slowing down your game to squint at the plunger. My goal here is to have a lot of different places to plunge to, and have the context of the game make you change which one you're plunging to frequently.

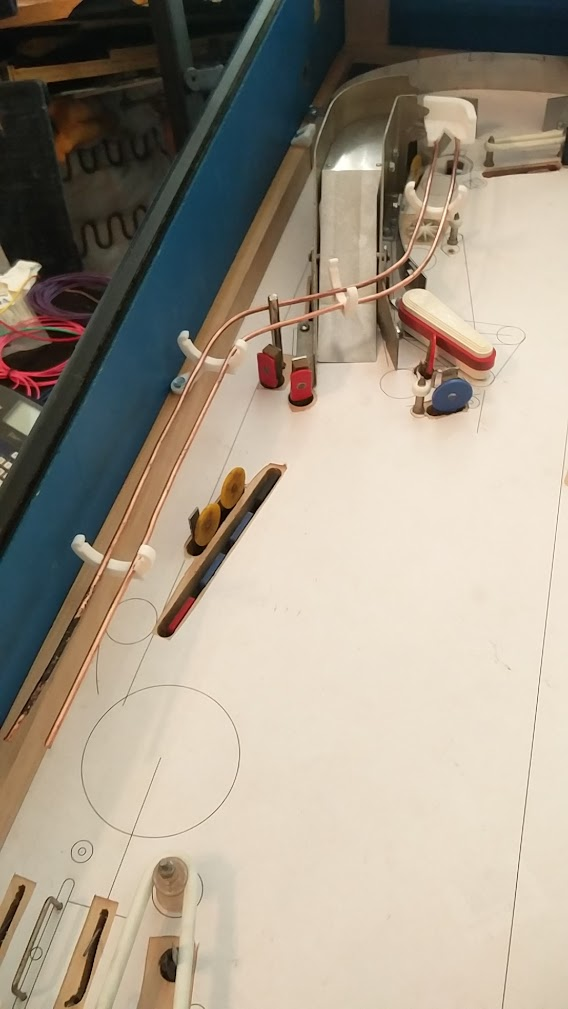
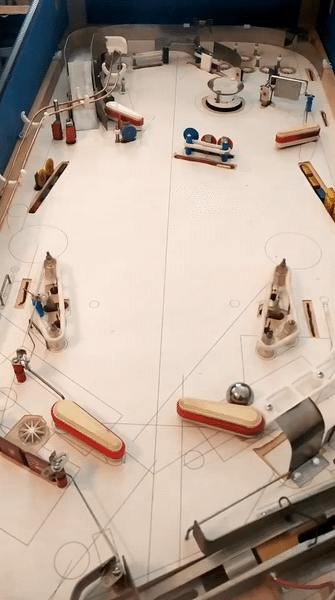
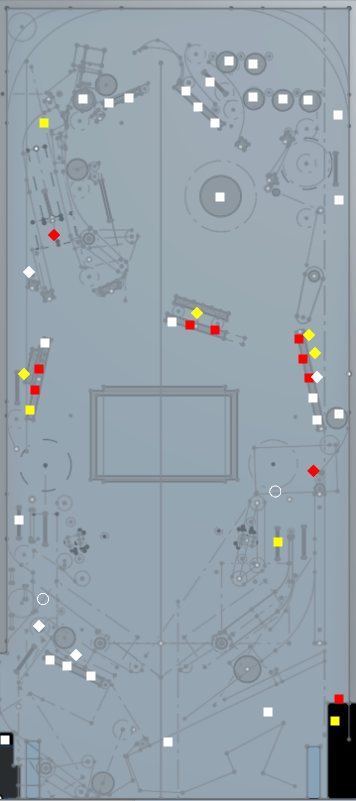
There are seven different places to plunge to:

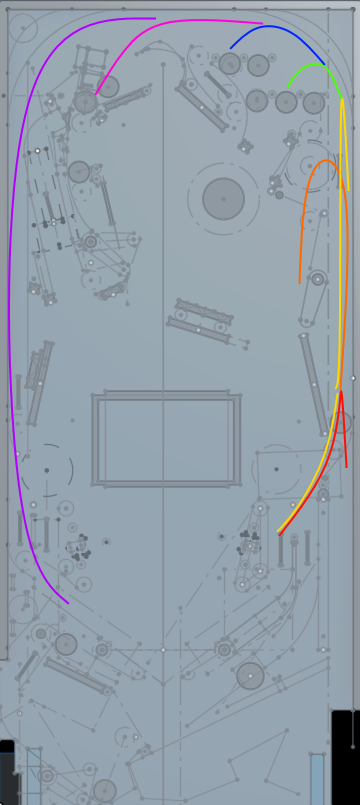
Red: plunge just far enough to clear the diverter. Diverter will close, leading ball to right inlane
Orange: plunge so that the ball hits the lower magnet switch, without hitting upper magnet switch. Magnet activates, pulling ball to the left and feeding upper right flipper (well, hopefully, if I ever get it working)
Yellow: if you plunge past the magnet and hit the upper magnet switch, you'll fall back down and feed the right inlane, similar to the red skillshot
Green: The lower 3 lanes. Not sure what will happen with each lane yet, maybe one will be lit as an extra target
Blue: Upper 3 lanes, same as green
Pink: plunge and fall into the upper eject which will then feed the upper left flipper. Really hard to do, worth the most
Purple: Hard plunge all the way around and feed the left inlane

The Pink and Purple skillshots are made harder since there's a one way gate to the left of the lanes, blocking them. Currently I have it timed so it's open for 2 seconds, then closed for 2, so you'll get redirected to the lanes or let through based on your timing.

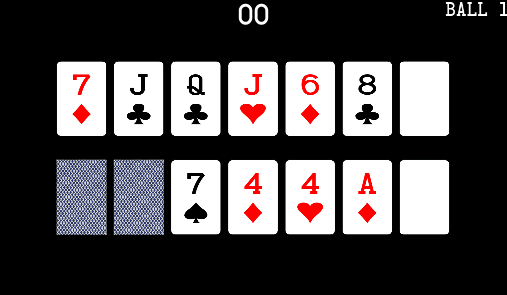
Your current 'bet' amount is determined by where you plunge, so you can choose to bet a little or a lot while still keeping it 'pinball'. I'm thinking the bet amounts will be percentages of your total 'bank', so you'll be forced to bet more later in the game. You can return to the shooter lane at any point while playing your poker hand by shooting under the upper right flipper, so you can adjust your bet if your hand is looking better or worse.

In addition, there will be an award on each skillshot, that you can only get if you 'call' your shot by selecting that award with the flipper buttons. Currently it's just points, but I want to eventually put other stuff in there to mix stuff up. If it's only ever points, they'll either just be ignored, or they'll be so big they're unbalanced, so I like to put 'in game' effects into stuff wherever possible. But that will have to wait until I have more game coded to affect.

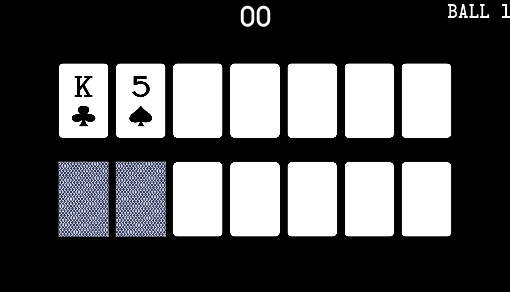
The graphics themselves on the screen are pretty basic right now, but serviceable. I kinda dread getting to the point where I actually need to make this stuff look nice somehow. Even for a simple screen like this, I think more code is dedicated to drawing and updating the screen than there is to the actual skillshot logic... It must have been nice in the DMD or alphanumeric games where you could often just slap some text up and be done with it

Posted Thursday, October 01, 2020
at 09:43 AM


Tags: Blog Post, Pinball, Project, P3,

Homebrew Pinball #3, Part 29

Cross posted from the original Pinside thread, this is one of many posts regarding my third homebrew pinball machine, creatively nicknamed 'P3'


I've spent a good amount of time playing with the upper magnet. It's positioned next to the shooter lane, right orbit, so that it can drop the ball to the upper right flipper.

The magnet had two use cases:
1. for the skillshot, if you plunge the ball up so that it stops next to the magnet, and then the magnet activates, pulling the ball sideways from the shooter lane to then release it to the flipper
2. to feed the upper flipper via left orbit shots. this is the main use case, with the skillshot just being a bonus. I didn't really forsee a problem with this while designing, but I've come to realize that this just isn't how magnets are normally used in machines. Games like Twilight Zone will stop a fast moving ball on an orbit, but they have the magnet directly under the ball's path. The magnet acts only as a ball grabber, not a diverter. Most cases I can find of magnets being used as diverters are things like TWD's crossbow, or WCS's lock. WCS is the closest to my use case, since it specifically grabs a moving ball, stops it, then drops it. But even WCS has issues grabbing a fast moving ball.

I quickly discovered that my original plan of wiring and mounting this magnet the same way the magna save is mounted just won't work. The magna save coil is being powered using 25V, while most newer games use 50V for their magnet. So I hooked up my 50V line to my magnet relay, instead of 25V, and... immediately fried my relay. The 50V is strong enough that, when the relay deactivates and its contacts move apart, the voltage will just arc across the gap and continue powering the magnet while melting the contacts. I had a similar issue with the 5-bank reset coil, and was able to fix it by adding a 10uF, 300V capacitor across the contacts. For some reason this doesn't work on the magnet. I wondered if the magnet was stronger, but the magnet actually has more resistance than the drop target coil. My random relay was only rated for 3A@25V though, so I ordered a really beefy relay, which was rated for 30A (!). I think my magnet should be drawing about 10-12A at 50V, so that should be plenty. But that relay also had constant arcing issues. I tried bigger snubber capacitors, other snubbing solutions, even disassembling the relay and physically bending it so the contacts are farther apart, and nothing helped.

It seems like switching 50V@10A just isn't reliable via a relay somehow, though I don't understand why. Modern games all control their magnets via transistors and mosfets, although I don't know if that is specifically to avoid this issue, or for other reasons. The problem is, I can't use those here, since my 50V has a separate ground from my 25V. My next plan is to get a TIP36C (which is what williams used for their 50V coils in the 90s), and then try to use a relay to switch the gate (instead of having a microcontroller switch it like normal) which feels like horrible overkill, but it may work. Even at that point, I'll still have issues because I can't PWM a relay, so I'll basically be running the magnet at full power. I'm not sure how long I can power the magnet like that, hopefully it's long enough to get the ball settled.

The magna save is also a completely 'below playfield' magnet, with no visible core. Adding a core that goes all the way through the playfield helps make the magnet stronger, and I assume that this is why games like TWD, which need to grab a ball shot at their wide bash toys, use an even bigger exposed magnet core. At first I figured I should just order one of those larger exposed cores, but they're incredibly expensive somehow (the large core costs more than the magnet itself!). Even a regular size core is expensive. I don't really want to spend that much money on something that may not even be useful, so for now I've just bought some 3/4" steel roundstock that I'll use to test the smaller exposed core. I can't find any info on how much stronger this make the magnet.

All this is still up in the air, too, as I don't know if the magnet will be able to grab the ball properly even with a large core and 50V, given the crazy speed my left orbit shot has. I've spent a lot of time trying just to get the 50V to work, and still haven't been able to even do a single test yet to see if the 50V can grab the ball since it keeps melting stuff

I'm also trying to consider other approaches, such as replacing the magnet with a physical diverter, but currently I can't find any good way to fit one in with my current constraints, and I would still need a magnet or an up post to hold the ball for a reliable side flipper shot after the diverter gets the ball to the flipper...

I may also try putting an up post in the shooter lane, specifically to stop the ball as it comes down the lane from the left orbit, and then using the magnet to pull the stopped ball over the flipper. I am running low on drivers for the coils though, so I want to avoid adding in more coils if possible...

Posted Tuesday, September 29, 2020
at 08:58 PM


Tags: Blog Post, Pinball, Project, P3,

Homebrew Pinball #3, Part 28

Cross posted from the original Pinside thread, this is one of many posts regarding my third homebrew pinball machine, creatively nicknamed 'P3'


Got the basic habitrail installed. Made a half height, low quality mount to hold the other end, which seems to work okay.

It looks like I can make the curve on the entry mount wider for a smoother feed. This is the original:

And here's my current iteration:

Mounting the entry mount was also an issue, since I didn't really plan for that. I ended up putting it on a standoff on top of one of the existing ramp's mounting holes, but I still only have one screw holding it. It seems to work okay, so I'll leave it for now. I could probably extend another support out to the posts behind the 2-bank if necessary, but I don't want to cover the playfield any more than necessary.

I also needed a place to mount the switch, so I stuck a microswitch through a small gap. To prevent airballs, I put holes on the top to screw a sheet of clear plastic into. Still need to figure out how to attach the plastic on the left side of the ramp. I don't understand how Mars never has airball issues on its ramp... seems hard to believe that they managed to make it the exact height needed for their flipper strength, especially since I'm using the same flippers!

This is my final entry design. Looks pretty weird, but it works. :

I had to add some side rails to keep the ball from falling off, especially at higher speeds. Lock post worked on my first try with a random guess for the pulse length, which surprised me.

While it's nice to know this works, I probably will avoid locking multiple balls this way, since I don't have any way to mount a switch behind it to know if it failed to release a ball due to the ramp positioning. Sadly, this was the only position I could fit the post mech in, so I'm a bit constrained here. I'mthinking I'm going to have most multiballs work by locking one ball on the ramp, and then you get a second ball to plunge, and the ramp ball is released once you hit a switch. Maybe there will also be something to let you short plunge and combo up the ramp to lock a second ball, for three ball, or a rule about locking both balls during MB to release a third. Since there's no auto plunger I can't really have a normal add a ball. I feel like multiballs lately have been a bit boring design wise, so I'm hoping to do more stuff with multiple phases like DE used to do, or maybe more advanced stuff like a special multiball that you can only work towards qualifying while you're already in another multiball, at the cost of ignoring the current multiball's jackpots to make that progress...

For normal ramp shots, I programmed the game to engage the post as soon as the ball makes the ramp, and then disengage once the inlane switch registers, but I had issues with the ball bouncing over the switch since it was just dropping off the end.Inspired by Metroid which I saw at Pintastic last year, I made this end cap for the rail to make the ball drop nicely.

It worked, but I didn't like how it looked, so I made this instead, which seems to work fine and looks more natural:

Posted Tuesday, September 29, 2020
at 06:30 PM


Tags: Blog Post, Pinball, Project, P3,

Homebrew Pinball #3, Part 27

Cross posted from the original Pinside thread, this is one of many posts regarding my third homebrew pinball machine, creatively nicknamed 'P3'


Here's a big case of 'wish I was using MPF'... Testing live on the machine was a pain since it was at the other end of the house from my regular computer. So I wanted to be able to easily test stuff virtually. MPF has a nice application for this. Lets you import a picture of your playfield, then drag and drop switches, lights onto it. Pretty handy, so I recreated it using my new rendering capabilities. Not a ton of work in the end, although mine lacks some polish...

Squares are switches. Red means closed, yellow/white means open. Left click to toggle open/shut, right click to quickly press the switch and release it again. Diamonds are coils, they turn red when energized. The white circle above the right inlane is a light, currently off, currently wired up as a 'lower ramp w/lit'.
Another in the left outlane will turn green when the mini-playfield is enabled, triggering the down post to let the ball in. Hopefully I can use this to get a slightly better feel for where lights will go.

I also added some code to do stuff like automatically opening the drop target switches when the bank resets, auto closing the shooter lane switch after a ball is released from the trough, etc. Stuff that would happen physically on a real machine. Otherwise it gets to be a pain to use, since the drop target coils would repeatedly fire until you remembered to click each switch again

Posted Tuesday, September 29, 2020
at 06:30 PM


Tags: Blog Post, Pinball, Project, P3,

Homebrew Pinball #3, Part 26

Cross posted from the original Pinside thread, this is one of many posts regarding my third homebrew pinball machine, creatively nicknamed 'P3'


Code can't get very far without some read-outs. I don't have any lights yet, so for now my 'screen' will have to do. Currently that 'screen' is a 50' HDMI cable running to my livingroom TV, but it'll do.... I spent a long time trying to find a good R-Pi compatible graphics library that would work with Typescript/Node. For some reason, everything seems to have been abandoned 2-3 years ago, and doesn't work with modern Pi operating systems. I'd be fine with even coding the graphics from scratch with a plain OpenGL context, but even a simple library to provide that seemed to be missing.

Eventually, I found a simple library that supported things like basic shapes, images, and text, that was designed specifically for RPi game dev, but had been abandoned partway through development. The author's last update said that they were working on keyboard/mouse support, since without that a game graphics library isn't very useful. Well, it's useful to me! no keyboards here...

Only problem was, it didn't work with the latest RPi OS, since they introduced a new graphics card driver, and it wasn't compatible with Windows (my dev OS). So I dug in, forked it, and made my own version with RPi 3 support, some features and bug fixes, and, with one late night hacking session, a shaky but usable windows port. Not too bad, all things considered. The nice thing about this, vs using an established library (if one had existed), is that if I find any other bugs or shortcomings, I can just easily add whatever I need, since I'm already maintaining my own fork.

With that out of the way, I got some initial status displays set up. Very rough currently; I am not in any way an artist. Hopefully I can work up something half decent for the screen at least, but actually doing some art for the playfield is probably beyond me... More mountains to climb down the road

I can add more cards from the drop targets

No scoring or ball logic hooked up yet though... I also need to figure out what exactly is actually going to happen once you complete a hand. To keep with the 'real poker' goal, technically you should have a final opportunity to bet before your opponent reveals their cards, so I figure you'll need to shoot a shot that can hold the ball to finally flip the cards and declare a winner. In this case, my only ball holds are the upper eject hole, the ramp, and the shooter lane, so I'll have to figure out some logic for that, as well as how exactly you can 'fold' if your hand is looking bad. I'd like it to be something on the playfield, vs some menu interaction, but it has to be something very hard to hit accidentally....

Current lines of code: 4,106

Posted Friday, September 25, 2020
at 10:25 AM


Tags: Blog Post, Pinball, Project, P3,

< Newer Posts
Older Posts >

Posts per page: 5 10 25 50 100